Sunday, December 18, 2011

Stringing it along....

I love wrapping gifts - so Christmas is a good time of year in that respect!

This year I'd been coveting the red and white bakers Twine that is all over the internet at the moment. I picked some up last month when we were in Sydney! My husband thought I was crazy that we go all the way to Sydney and my first purchase there was.........string!

Well, this festive string has a bit of a natural look to it so doesn't really work that well with the glossy, patterned Christmas papers, so some regular plain brown paper was in order.
I tizzied up the ladies' gifts with the other over exposed ever popular paper product...doileys, but that wouldn't do for the men!  Instead I got the printer fired up and made up some labels with a vintage wreath image and a holly border.


Now what am I going to do with the other 45 meters of Red & White string?
Pin It

Sunday, December 04, 2011

Sydney.............

In my last post I may have given the impression that since the term finished, I've been chained to the vaccum cleaner. Well that's not strictly true....M and I did find time for a short break on the other side of the continent.
We were celebrating our 33rd wedding anniversary on the 11/11/11 (Don't you love those numbers! - it wasn't planned back in '78 - just a lovely numerological coincidence!) and then M.'s Birthday on the 16th. What better excuse to spend 6 nights in fair Sydney Town down at the best ever location in the Rocks!
What can I say, we hadn't visited there in 25 years and it's still an awesome city.....

The  Icon ;) Covered in self cleaning tiles no less!
The other icon complete with a most cooperative Seagull


 Icon 2 viewed from inside Icon 1
 Icon 1 viewed from Icon 2 - it was high - I felt brave!
The Heights: Didn't climb over but did walk across the bridge!
The Gaudy:  No, I don't mean Murray !
The Quirky - No washing just birdcages!
The Arty- Recreation of the original laneway.


The Old Buildings - They treasure them and don't flatten them.
The Oldest Pub - one of many we visited :)

The Atmosphere: Friday night markets at The Rocks.


The Unusual: A Lovely pressed metal construction.....Umm... a urinal!

Thanks for joining me in my express 12 photo tour of the Rocks in Sydney. Believe me,you got off lightly -I was rather snap happy and took 251 photos. Maybe I'll put some of the other better pics up on Flickr. I'll pop the link up here when I get the chance to upload them. Pin It

Friday, December 02, 2011

End of an era - well that sounds rather dramatic....

"Life is what happens to you, while you're busy making other plans" John Lennon 

My year of study has come to an end. It happened over a month ago, but this is the first chance I've had to blog -  I've been filling  my time with other creative endeavours...........Hmmm, I wish.......I've actually been catching up on the housework, but it does make me somewhat happy to have a clean kitchen floor and a tidy linen closet ;)
I'm still waiting for my Cert 2 in Jewellery Manufacture to arrive in the mail. I've passed but I've been told not to hold my breath for the actual certificate to arrive. In the meantime I've done nothing creative! Despite my smug attitude about my kitchen floor and the sparkling bathroom tiles (did I mention the sparkling bathroom tiles?)  I thought that with the extra free day each week now the course has finished, that I'd be churning out magnificent jewellery creations, but no.....  it's pretty much been housework and the occasional half decent meal every now and then!
I still have my copper pipe trinket box to finish. It's probably only a half hour or so of work  to get to the clean up stage but the weather's hotting up here in Perth and soldering out in the tin shed isn't that appealing at the mo. And of course it's the "season to be merry" and lots of shopping, wrapping, decorating of trees, socialising and prep to do before Christmas. Yeah,  I know.....excuses, excuses!

To be continued.................


Pin It

Wednesday, October 12, 2011

Class countdown!

The Tafe year is nearly over for my course. I have mixed feelings - I'm looking forward to spending the time at home creating instead but really will miss the classes. And then there's the motivation issue when I'm at home - there's so many distractions: housework, shopping, washing, ironing and cooking.
I'm not saying I do them but the need to do them definately distracts me from the task of creating ;) Not to mention the biggest distraction of all - The Internet!!!
Anyway, we had a great day in class yesterday. A classmate is working on a new range and the teacher gave us all a lesson/demo in how to make a rubber mould. Jane was then able to use the mould and use the wax injector to reproduce her design in wax.

I took about 20 grams of scrap sterling in to class and melted it into an ingot then spent far too long (but I love doing it) rolling it down on the mill and then drawing it down into .8mm wire which I'll being using for earring hooks.

Another classmate Carolyn generously bought in some copper pipe for me to use for future trinket boxes. The teacher took us down to the metal workshop and we had it sliced on the cold metal bandsaw (at least I think that's what it was).
It took the metal workshop teacher a few minutes to do and will definately save me an hour, probably more of sawing. I'm always pleasantly amazed at the resources available at Tafe.

I also rolled down my ingot from last term a little more. I've decided I'll leave it now at about 1.5mm thick until I have a definate project in mind for the silver.


We also got the course info for next year. There's a possibility that we may be able to enrol in the Advanced Diploma as part time students and just do a few of the units. There's about 5 of us from this course interested in doing more.  Love to be able to do that if it fits in with all the other commitments I have, like family and the day job!

Now that the formal class projects are out of the way I have to plan what I want to do in class next to make the most of my last 3 classes............. 


Pin It

Tuesday, October 04, 2011

Brass Box Pictorial

Here are the pictures I took as I was making my little round Brass Box.
This isn't a tutorial (I wouldn't presume to try and tell anyone how to do this - I barely managed it myself !) It's more of a pictorial to show you my process - It was my first attempt to make a box and I'd be more than happy to hear suggestions if you know of a better or easier way to make these :)

I started with 1mm sheet brass which I formed and soldered into a 3cm diameter tube about 2 cm high....then:

I carefully sawed around the mark I had made with the calipers.
Yay! Two pieces - a lid and a base

Sand on flat surface in figure 8 action. I do this as required.
I used  a cardboard template and made an extended lining to fit lid .
Lining Soldered in - now checking for fit to the base.
Working on the Base now - Bottom soldered on.
Sawing off the excess
Shoddy Sawing! Lucky I enjoy filing :) Tweak the lid to fit!

That looks better - after filing & some sanding.
Aaargh! Never noticed that before - back to re solder that bit!
Working on the lid now- soldering the top on.
After sawing. You knew I'd textured the lid in the rolling mill, right?
Ready for more and more filing fun....and some sanding.
More clean up ...then.......All done - Here 'Tis
The Lid comes off...but it fits back on....phew - wipes brow! :)
Yep - I even cleaned up the inside.
This is just a brief summary but if you have a any questions just leave a comment and I'll be happy to give more details if I can. Pin It

Works in progess.

On a week's break from class so here's a snippet of some other projects I'm working on.

I pulled apart our broken toaster to salvedge the Stainless Steel outer casing. Hope to saw & pierce out some simple shapes in the not too distant future from the sheet. It's 0.5mm.


I'm also working on making a little round pill box/trinket box. The sort with a friction fit lid. Had no idea how but just jumped in anyway.


That's the lid on the left - I sweat soldered the outer piece to the inner piece when they were just flat strips. Bit like a stepped bezel really, but inside out ;) On the right is the base piece which when soldered will fit over the inner part perfectly....well in a perfect world! In reality it didn't. I thought I'd measured and cut correctly but darn - obviously I didn't!

Earlier in class the lecturer saw the lid and suggested an easier method to get a matching top & base: Start with one piece of tube and saw it to make two parts exactly the same diameter. So I put the lid to one side and reused the base piece to try it out. Funnily enough I'd thought of this earlier and abandoned the idea as too difficult, which was why I did it the other way. Well I got that arse about eh! LOL


I scribed a mark around the tube with my calipers and clamped the tube in the vice, just sawing a little at a time along the line on the top of the tube then repositioning the tube to continue sawing the next bit of the line. This went suprisingly smoothly and Voila! in no time: 2 pieces!


 Next step is to fit in the inner lip in the lid (or the base - don't think it matters which one?) Then solder on a top and bottom plate.

I'll let you know how i get on ;) ......................


Pin It

Saturday, October 01, 2011


Tafe -Weeks 29 & 30.

Last two weeks of term and we had a chance to use tools again that weren't pencils or related to wax! Oh how I've missed you torch, saw and files!
Our final assessable project for the completion of our certificate was to make a ring from scratch. This was the project:
  1. Calculate and weigh out how much copper to add to 10 grams of fine silver casting grain.
  2. Melt the grains and pour an ingot. 
  3. Roll the (round) ingot into a square bar of 4x4mm. 
  4. Roll the square bar into flat stock, measure up bearing in mind that the finished ring must be exactly 4.1mm wide and 1.7mm thick
  5. Form into a ring band and solder. 
  6. Then it's to be finished to a 600 grit finish ready for marking. When it's finished our solder seam must not be visable, have no pits etc and the ring must be a perfect size L.
Work in progress with the left over strip in the background. Still some cleaning up to do.


Yay! Right width! You'll have to take my word on it that the other measurements were right too!
 The vernier calipers have been in demand these past two weeks, that's for sure! We did make a ring earlier in the year but we made it to fit ourselves and were assessed on the finish rather than measurements, so this was more of a challenge, especially when we were told that if it didn't meet the requirements we'd be melting it down and starting again! The idea behind this project is that for students seeking industry jobs, they can be sent off to their new apprenticeships and have the skills to make a wedding band to the exact standards and size as required by a client/boss. Apparently making ring bands is the most common practise in the industry! I'd never really given it much thought, but it figures!

Anyway - all done - no remelt required! :) And a bonus - the Size L fits me............. Pin It

Why it pays to save your Silver scraps!

Last TAFE lesson I melted down some of my sterling silver scraps. The years of collecting excess headpin and wire offcuts and other silver scraps has paid off. I ended up with a rather hefty ingot of sterling weighing 102 grams (just over 3.2 troy oz). I've more scraps to take in next term too. Here's a pic taken after a few turns through the rolling machine.

It's got a way to go yet before I can use it - lots of annealing and rolling to do!


Pin It

Friday, September 16, 2011

Out Cast!

Tafe - Weeks 24 -28

I haven't blogged lately so here's a rundown on the last month or so of Tafe lessons.
Our project was to design and carve a piece in wax, ready to cast.

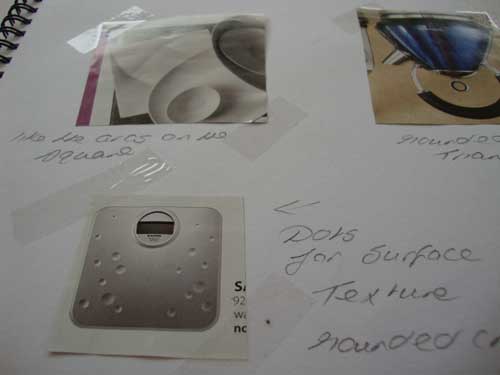
First up - research & inspiration :) After many hours of web browsing and looking through books, inspiration was eluding me! Who'd have thought that it would be while flicking through a Store catalogue junk mail that I spotted a dinner set and inspiration finally hit. The contrast of the plain square shaped plates with their lovely fluid curved profile appealed to me. Then on the next page I spotted a set of bathroom scales and loved the dots! Finally I had a starting point.....


The next step was to sketch out some designs, so the drawing lessons we did earlier in term had come in handy already. I'd come up with a couple of designs but in the end I abandoned the triangular idea (Swiss Cheese anyone!) in favour of the curved square with some dots and texture.


Next step was the tech drawings which had to be to scale. Drawing comes naturally to many people - unfortunately I'm not one of them..


Then on to the wax carving. I started with a block of Green wax and the fun began. Sawing and shaping first  then carving out the shape. My shape was much easier to form than the knot I carved out in an earlier lesson, so this step went pleasantly quickly.  Once the front surface was shaped and sanded smooth I applied the surface texture - I used a bur to make the little concave depressions and a scribe to make the scratched lines.
The thing with casting is to get the wax as light weight as possible, so the back had to be carved out so it wouldn't use more metal than necessary when casting. Also, the piece can't be too heavy to wear - the weight of a piece in sterling silver would be about 10.5 times the weight of the wax. So I set to work with a bur in a pin vise to hollow out my wax.


 The wax block is a dark bottle green - the aim is to have it looking a consistant pale translucent green when it's held up to the light.


Later I did lots more tidying, carving and sanding and the final wax weight was about 3 grams. I was really happy with the finish and so was the teacher! The better the finished wax model is- the less work needs to be done on the cast metal piece. I didn't take a final pic though as we sprung into action in the afternoon getting our pieces sprued up and into the flasks to pour in the investment, which is like a super, super fine plaster of paris.

For those not familiar with casting: the metal flask contains the wax model with the hardened  investment around it, and  is placed in a kiln to heat up - the wax melts out leaving a void in the investment. About 6 to 8 hours later the flask is removed from the kiln and the molten metal is poured into the hot investment and fills the void so the shape can be replicated in the metal! There's a bit more involved but you get the idea.

Which brings us to this week's lesson - The flasks were in the kiln and we busied ourselves drawing colour renderings of our designs..... these had to be a standard suitable as if to present to a client. Now mine doesn't look too colourful really but that's what happens when you are drawing silver!  I used 4 shades of grey and an indigo!


Still with me? A bit long winded I know, but this is the condensed version of about 5 class days!  I suspect that you will be dissatisfied with the ending of this story though!

After being removed from the kiln, a little piece of investment chipped away from inside the flask. Not sure what happened as I was busy melting my silver at the time, but it chipped in a crucial location and any silver poured in at the top would have gone straight through to come right out the bottom!
There was lots of speculation about what caused the investment to chip off - possibly my positioning of the wax in the flask (not enough clearance - don't think it was this) or my prep of the investment (hmmm - quite possibly) or it could have been no fault of mine - the flask could have been knocked going in or out of the kiln or any number of other mystery reasons.  
The lecturer tried a last ditch attempt to cast anyway by plugging up the chipped investment with wet paper towells but by the time we got the silver remelted the flask had cooled down too much and the silver just spat back up out of the flask during the pour. My casting had failed!
My piece went from  "one of a kind" to "none of a kind" in the space of a few minutes (insert sad face here)
Here's the remnants of my silver which I reclaimed from the investment and the work bench. 


Teachers and fellow students were mortified for me but on the upside, (there's always a silver lining eh? oops - excuse the pun - sorry!) I won't have to spend next week's lesson removing my sprues and cleaning up my casting!


Pin It

Wednesday, August 10, 2011

Drawn Out!

 TAFE: Weeks 21, 22 & 23.

Back at Tafe for Semester 2, we're 3 weeks in and for the first 2 weeks didn't touch a tool or a torch! Well that's unless you consider a pencil a tool!

We've been learning the practical aspects of design, particularly rendering jewellery designs with a little bit of tech drawing thrown in.

This may seem basic but it's been many years since my high school art, so it was new to me - first the basics of shading, light source etc

Then with coloured pencils

Later we learnt how to draw twisted wire and a chain


More drawing practise, this time learning the best colours to use for rendering in gold & silver then learning the tech methods of drawing a ring to scale.


Then the pencils were put away and at last some tools came out - hmmm, wax carving tools. And now for the piece that took a day and a half out of my life!!
The cord piece was the model and we had to carve a 3D model of the knot from a block of wax. I found this incredibly difficult and it was a great relief to finally finish it, having confirmed my suspicion that I'll never make the cut as a sculptor!


Pin It